การอัพเกรด ESXi สามารถทำได้หลายวิธี ปกติผมจะใช้วิธีสร้าง USB Boot ESXi Installer แต่วันนี้จะมาใช้วิธี online upgrade ผ่าน cli
โดยเริ่มจาก
1) SSH หรือ console ที่ ESXi ขอละไม่พูดถึงวิธีเปิด service ดังกล่าวนะครับ
2) จากนั้นพิมพ์ vmware -v เพื่อตรวจสอบเวอร์ชั่นก่อนอัพเกรด
[root@NUC-1:~] vmware -v

VMware ESXi 6.0.0 build-3620759

[root@NUC-1:~]

3) เปิดไฟร์วอลล์ด้วยคำสั่ง
[root@NUC-1:~] esxcli network firewall ruleset set -e true -r httpClient

[root@NUC-1:~]
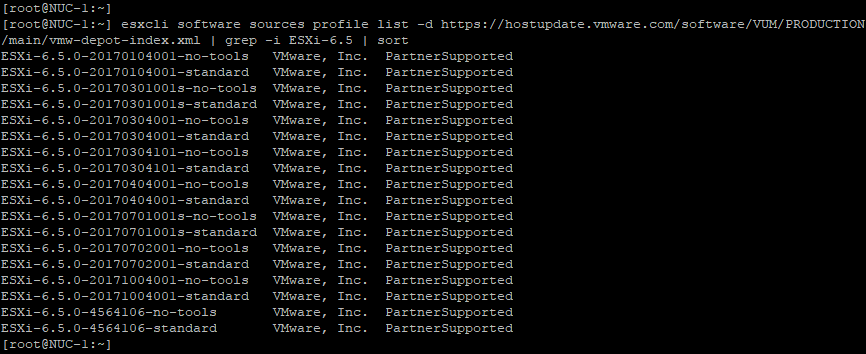
4) list เวอร์ชั่นอัพเกรดที่มี
[root@NUC-1:~] esxcli software sources profile list -d https://hostupdate.vmware.com/software/VUM/PRODUCTION/main/vmw-depot-index.xml | grep -i ESXi-6.5 | sort
จะได้ผลลัพธ์เป็น
ESXi-6.5.0-20170104001-no-tools   VMware, Inc.  PartnerSupported

ESXi-6.5.0-20170104001-standard   VMware, Inc.  PartnerSupported

ESXi-6.5.0-20170301001s-no-tools  VMware, Inc.  PartnerSupported

ESXi-6.5.0-20170301001s-standard  VMware, Inc.  PartnerSupported

ESXi-6.5.0-20170304001-no-tools   VMware, Inc.  PartnerSupported

ESXi-6.5.0-20170304001-standard   VMware, Inc.  PartnerSupported

ESXi-6.5.0-20170304101-no-tools   VMware, Inc.  PartnerSupported

ESXi-6.5.0-20170304101-standard   VMware, Inc.  PartnerSupported

ESXi-6.5.0-20170404001-no-tools   VMware, Inc.  PartnerSupported

ESXi-6.5.0-20170404001-standard   VMware, Inc.  PartnerSupported

ESXi-6.5.0-20170701001s-no-tools  VMware, Inc.  PartnerSupported

ESXi-6.5.0-20170701001s-standard  VMware, Inc.  PartnerSupported

ESXi-6.5.0-20170702001-no-tools   VMware, Inc.  PartnerSupported

ESXi-6.5.0-20170702001-standard   VMware, Inc.  PartnerSupported

ESXi-6.5.0-20171004001-no-tools   VMware, Inc.  PartnerSupported

ESXi-6.5.0-20171004001-standard   VMware, Inc.  PartnerSupported

ESXi-6.5.0-4564106-no-tools       VMware, Inc.  PartnerSupported

ESXi-6.5.0-4564106-standard       VMware, Inc.  PartnerSupported

[root@NUC-1:~]
no-tools หมายถึงไม่รวม VMware Tools
standard จะรวม VMware Tools มาด้วย แต่จำนวนข้อมูลที่ต้องดาวโหลดก็มาขึ้นอีกนิดหน่อย
5) สั่งอัพเกรด ด้วยเวอร์ชั่นที่ต้องการ
[root@NUC-1:~] [root@NUC-1:~] esxcli software profile update -p ESXi-6.5.0-20170104001-standard -d https://hostupdate.vmware.com/software/VUM/PRODUCTION/main/vmw-depot-index.xml
จะได้ผลลัพธ์ยาวมาก ตัวยย่างข้างล่างตัดมาแค่บางส่วน แต่ตอนต้นๆ จะมีบอกว่า “Reboot Required: true”
Update Result

   Message: The update completed successfully, but the system needs to be rebooted for the changes to be effective.

   Reboot Required: true

   VIBs Installed: VMW_bootbank_ata-libata-92_3.00.9.2-16vmw.650.0.0.4564106, VMW_bootbank_ata-pata-amd_0.3.10-3vmw.650.0.0.4564106, VMW_bootbank_ata-pata-atiixp_0.4.6-4vmw.650.0.0.4564106, VMW_bootbank_ata-pata-cmd64x_0.2.5-3vmw.650.0.0.4564106, VMW_bootbank_ata-pata-hpt3x2n_0.3.4-3vmw.650.0.0.4564106, VMW_bootbank_ata-pata-pdc2027x_1.0-3vmw.650.0.0.4564106, VMW_bootbank_ata-pata-serverworks_0.4.3-3vmw.650.0.0.4564106, VMW_bootbank_ata-pata-sil680_0.4.8-3vmw.650.0.0.4564106, VMW_bootbank_ata-pata-via_0.3.3-2vmw.650.0.0.4564106, VMW_bootbank_block-cciss_3.6.14-10vmw.650.0.0.4564106, VMW_bootbank_char-random_1.0-3vmw.650.0.0.4564106, VMW_bootbank_ehci-ehci-hcd_1.0-

6) เสร็จแล้วก็ปิดไฟร์วอลล์ ที่เปิดไว้ด้วยคำสั่ง
[root@NUC-1:~] esxcli network firewall ruleset set -e false -r httpClient
ึ
7) แล้วก็ reboot
[root@NUC-1:~] reboot
8) ถ้าอยากตรวจสอบก็ SSH เข้าไปรัน vmware -v อีกครั้ง
[root@NUC-1:~] vmware -v

VMware ESXi 6.0.0 build-4887370

[root@NUC-1:~]